
 Deutsch
 Slovenščina
Easy ordering and thickness calculation with AlcomOnline
Advantages of AlcomOnline ordering software:
- easy ordering even outside working hours, 24 hours a day
- excellent overview of placed orders
- automatic thickness calculation
- comparison of different types of lenses by thickness and weight
- Lux thinning preview
- the connection of the tracer allows you to include lens shapes in the order
- we deliver precisely edged lenses to the desired shape with the option of remote edging and mounting the lenses by yourself.
AlcomOnline user guide, installation and update instructions can be found in the published video tutorial.

USERNAME AND PASSWORD FORM
ALCOMONLINE INSTALLATION
Video instruction for installation
Alcomonline ordering
Video instruction for upgrade
1. Click on the link AlcomOnlineSetup (44 MB), download and save file. Some browsers could warn you about the safety of the file. You can confirm that you will accept the file.
Start the program AlcomOnlineSetup_20200511.exe, Yes, Next, Accept, Next, choose destination folder C:LensOrder, Install.
Dowload AlcomOnline
2. Start the program. If you need help, click Help, Remote maintenance, “Yes”. Please contact Alcom for support. Alcom will remotely connect to your computer and make sure your settings are correct and will then assist you on how to use the program.
3. Click on the Extras tab, Settings and enter your details:
– General: Select printer. The size of the print can be set with Form Enlargement, so the size of lenses on the printout is realistic.
– Customer data: Enter your company data
– Customer No: this number is assigned to you by ALCOM*
– Customer group: is a data of a parent company
– Name, Street, Place, zip code: Company name, street, city, postal code
– Password: password is provided to you by ALCOM*
* please send the request for Customer number and Password here
Save is for storing data. Other data can be set up by ALCOM (remotely).
In Alcom we are constantly developing our products and services. New products and improvements are immediately available in AlcomOnline. Software is automatically updated. You can always manually check for updates.
4. Click on Extras, Product data Update online (updating lenstypes, additional treatments and frames):

For manual software update click on Extras, Program update online:

We recommend regular updates of software. We will inform you about the available upgrades.
The program is ready for use!
1.An overview of all orders can be seen in the start window. You can also see order statuses there. Click the ‘New’ button to create a new order.

2. Select order type:

– Standard for ordering lenses with an optimized diameter based on the shape sent (lenses will be sent round / oval, not cut to a specific shape),
– Remote edging for ordering lenses edged to specific shape (lenses will be sent edged to a shape, optician will mount lenses in the frame),
– Glazing for ordering lenses, that will be mounted in frames, provided by opticians.
– Spectacles for ordering of complete spectacles (lenses and frames provided by Alcom).
NEW: Use the filters on the left to select the refractive index (1.50 – 1.74), colour (White, Photo / Polar) and type of lens (progressive, office, single-vision).
3. Enter dioptry and centration info: Sphere, Cylinder, Axis, Addition, Prisms, PD, Height. More about correct height measurement:

4. Select Lens Type, Color, AR Coating. Coloring codes and additional coatings depend on the type of lens, e.g. tinting is not possible with Transitions lenses.
5. Select the diameter of the lens, the desired thickness at the edge or in the center, the base curve.
6. In the Reference field, enter order number, enter your note in the Remark field.
7. Click the Individual button to enter additional individual parameters:
– Vertex (standard 14, optional 0 – 30mm),
– Pantoscopic inclination (line standard 9°, single-vision 7°, optional 0 – 25°)
– Reading distance in centimeters (standard 40, optional 20 – 60cm),
– Wrapping angle of the frame (more on Map for measuring the horizontal curvature of the frame), (standard 5°, optional 0° – 21°)
– Inset (nasal shift of the near field of the lens relative to the far field), (standard 2.5, optional 0 – 6mm)
– Minimum fitting height,
– Diameter of the Lux lenti field of view,
– Lenticode – thinning type for Lux lenses (_LP for negative and _LPES for positive diopters),
– Engraving of initials,
– Degression – reduction of Reader work lenses (0.50 – 2.25D).
Click Save to save the data.

8. If you have a tracer connected, click on the Trace shape button in the Form data tab to download frame information from the tracer. Determine the frame type, facette, depth and width for the nylor groove, base and wrapping angle of the frame.
9. Instead of manually entering the lens diameter or tracing the frame, you can choose to select one of the standard frames by clicking the Manage form button. You can change the dimensions of the lens by clicking the Change shape button.

10. You can also select a frame on the Frames tab. All frame data, including the required lens thickness, is already set. Confirm the selected box by clicking the Load Frame button.

11. To calculate the lens thicknesses, click the Calculation button on the Lens or Form data tab.
By clicking on the Comparative lens, you can select the type of lens to compare the thickness.
Click the Calculate lens button. Thicknesses, base curves, and weights are calculated in 10 to 20 seconds. For such calculation the same server is used as for the calculation of the lenses of Alcom’s production. The thicknesses are accurate – deviation up to 0.1mm!
The Calculation tab contains basic information about calculating lenses:

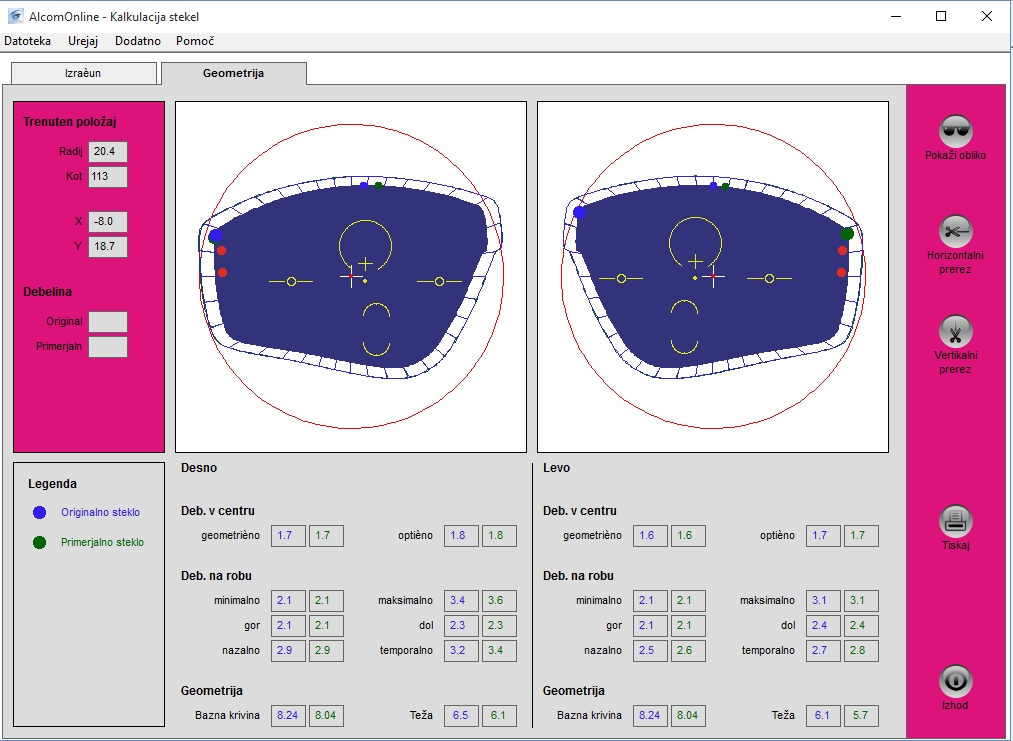
The Geometry tab contains a graphical display of thicknesses, data of thicknesses in the main points of the lens and its weight.
Taking the difference in diopters between the right and left lens in account, you can equalize the thicknesses. Estimate the minimum thickness of thinner glass (Edge thickness, minimum). Click the Exit button and enter this thickness in the Minimum edge thickness field in the Lenses tab.

12. Click the Save button to save the order. You can now enter a new order. Click Exit to return to the order list.
Prepared orders (Status Ready) can be edited by clicking the Edit button.
To prevent an order to be sent, left-click it, then right-click to open the status change window.

By clicking the Send button, the order is sent to Alcom. Changes are possible up to 30 minutes after placing the order. Changes must be made by telephone!
At Alcom, we are happy to advise you on the use of the AlcomOnline software. For help, press Help, Remote maintenance, OK,… or call our customer support to connect to your computer and help you use the software!